Selecting the appropriate Build Configuration is an important step when packaging your Unreal Engine project. Each configuration serves a specific purpose, ranging from development and testing to final release optimization.
This guide explains the differences between the available build configurations in Unreal Engine, helping you choose the most suitable one for your current project phase.
Prerequisites
Before proceeding, ensure you have the following:
-
An UE Build ready for Packaging.
Instructions
Step 1. Open Your Project in Unreal Engine Editor
Launch your project in the Unreal Engine Editor.
Step 2. Navigate to: Platforms > Windows
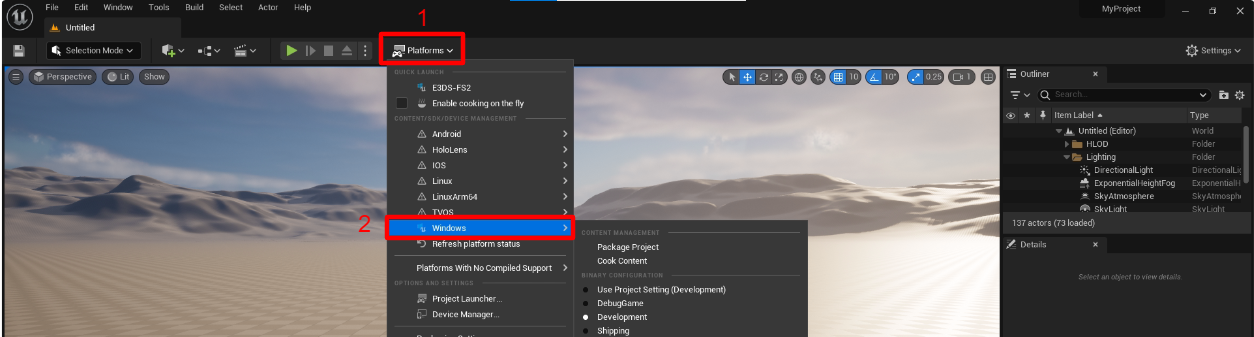
Step 3. Review Build Configurations
Unreal Engine provides several build configurations. Choose the one that aligns with your development or release needs.
Development
-
Designed for active development with minimal debugging support, but better performance than Debug builds.
-
Provides fast iteration times and easier debugging (console access included).
-
Includes additional debugging information.
-
Less optimized for final performance; not suitable for production releases.
-
Logs: Prints debug messages and allows console commands.
Debug
-
Contains extensive debug information and symbols for easier troubleshooting.
-
May be slower and larger than Development builds.
-
Not intended for final game releases.
-
Logs: Prints all debug messages; extensive logging for troubleshooting.
Shipping
-
Intended for the final, distributable version of your game.
-
Fully optimized for performance and size; no debugging information or debug-oriented features included.
-
Console access is disabled.
-
Best suited for production release; not suitable for development or testing.
-
Logs: Does not print debug messages.
Test
-
Similar to Shipping, but with additional checks and safeguards for testing purposes.
-
Slower than Shipping builds due to extra validations.
-
Primarily used for internal testing before final release.
-
Logs: Prints limited debug messages; some checks included.
DebugGame
-
Balances Development and Debug configurations.
-
Offers faster iteration than Debug builds but still includes debugging checks.
-
Not available for Blueprint-only projects.
-
Logs: Prints some debug messages; limited logging compared to Debug.
Tip: Developers often switch between configurations:
Development/Debug during active development and testing.
Test/Shipping for performance validation and final release.
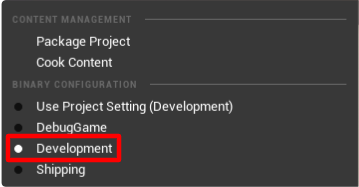
Step 4. Select Your Configuration
Choose the configuration that best suits your current project stage.
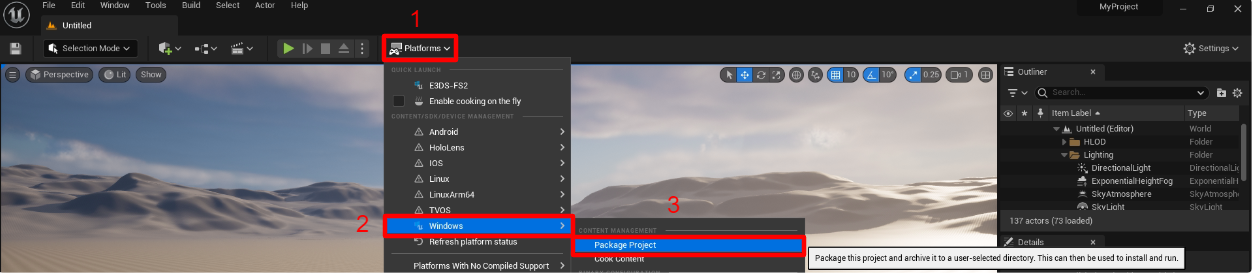
Step 5. Package the Project
Once your configuration is selected, navigate to: Platforms → Windows → Package Project
Follow this guide to Package your Project.
Summary
Note: This table reflects recommended usage. Development, Debug, or DebugGame builds can be uploaded, but they may include debug information, logs, or less optimization compared to Shipping builds, which are ideal for final distribution.
|
Configuration |
Recommended For Development / Testing |
Recommended For Final Release |
|---|---|---|
|
Development |
✅ |
❌ |
|
Debug |
✅ |
❌ |
|
DebugGame |
✅ |
❌ |
|
Test |
⚠️ (internal testing) |
❌ |
|
Shipping |
❌ |
✅ |
Next Step
After packaging, you can create an account and upload your app to the E3DS Platform.
Need help?
If you need any assistance, feel free to reach out through any of the following channels:
🛠️ Support Portal: Contact Our Support Team
💬 Discord Community (Faster Support): Join Our Discord Community
📧 Email Support: support@eagle3dstreaming.com
Follow us on:
Facebook | GitHub | LinkedIn | YouTube