Upload an App
Learn to Upload an Unreal Engine Application on Eagle 3D’s Platform.
Prerequisites
Instructions
Make sure to Test your App Locally with Epic’s Signaling Server before uploading.
Step 1. Select all the files in your Root folder
In the Root folder, where the exe file of your Application is located, select all the files and folders.

Image 1: Project’s Root Folder: Select all the files and folders
Step 2. Create an Archive of your Packaged Project’s Root folder
Note : If you upload a project without archiving it first, the upload will fail.
The Supported archive format is ZIP.
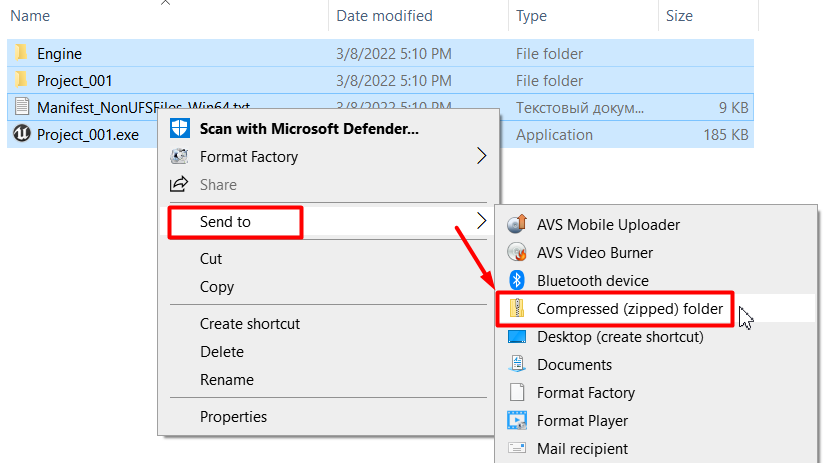
Use ZIP as your Archive format, right-click on the selected files →Send to → Compressed (zipped) folder

Image 2. Right click on the selected files: Send to : Compressed (zipped) folder
Step 3. Add the name of your App
Go to: Control Panel → Step 1: App Selection → Add → enter the name of your App → click OK
The name of your App should match exactly the name of your exe file from your Root folder.
If you input a different name, your App will fail to start (it will get stuck on the loading phase (Starting App page))
The App name should NOT contain any dot or space as it might cause streaming issues.
.png?inst-v=27e98e0b-a7f8-4fea-87e8-8659c502a385)
Image 3.Control Panel: Step 1: Select an App : Add
Step 4. Upload your App
Click Upload from Step 1 : Select an App
A new tab of the Uploader page will open in your browser.
Note : For the first version of your App, enter the name of the App before clicking the ‘Upload’ button, or else, an error warning message will appear.
.png?inst-v=27e98e0b-a7f8-4fea-87e8-8659c502a385)
Image 4. Control Panel: Step 1: App Selection: Click Upload
Click Browse → select the archived Project → Open

Image 5. Upload the Application: Open Project Archive
Click on ´Verify´ for a verification of the zip file
.png?inst-v=27e98e0b-a7f8-4fea-87e8-8659c502a385)
Image 6. Uploader : Click Verify
Click Upload
In the progress bar, you will see the application uploading progress

Image 7. Uploader : Project uploading

Image 8. Upload Completed
Your App is successfully uploaded if the progress bar displays "Upload completed"
Tip : Refresh the page to see your App in Step 1: Add an App.
Now you are ready to Upload your Project on Eagle 3D’s Platform !
Set a new Config from your Control Panel.
Was this article helpful? Comment Below. Let us know your feedback.
Need help? Contact Support
Submit a new request at E3DS support portal.
Requests sent on weekends will not be addressed until the following business day.
