
AFK Close Timeout (Minutes)
Steps to set a Close Timeout (Minutes).
This feature is particularly useful for users on the Pay Per Minute (PPM) plan, as it helps reduce streaming time and save on usage. [Select the PPM plan here].
Similar Features:
The ‘AFK Warn Timeout' Feature ([See this document]).
The ‘Session Duration' Feature ([See this document]).
The ‘URL Expiry Date’ Feature ([See this document]).
The ‘Close Tab on Losing Visibility’ Feature ([See this document]).
If the 'AFK' feature and any other session expiration settings are disabled in your Config, the app can stream for extended periods without disconnection. This YouTube video demonstrates 10 hours of continuous streaming showcasing that our system has no session limits.
If a disconnection occurs, it may be due to a crash or network issue. Please contact Support for assistance in resolving the problem.
For uninterrupted streams exceeding 10 hours, consider switching to an Enterprise plan and ensure a strong, stable internet connection.
Overview
Configure your app in the Old Control Panel to automatically disconnect the streaming session after the ‘AFK Close Timeout' countdown ends, following the warning message which gets triggered by a specified period of inactivity.
Prerequisites
Access to the Control Panel.
A user Account.
Instructions
Step 1. Sign in to the Old Control Panel
Login to the Old Control Panel.
Step 2. Select your App
In the Control Panel:
Navigate to: Step 1 : Select an App.
Select your App from the drop down menu.
You can also Add a new App, refer to this document.
Step 3. Select/Create your Config
In the Control Panel:
Navigate to: ‘Step 2 : Create a Config’.
Select your Config from the list.
You can also create a new Config, refer to this document.
Step 4. Access the ‘Session’ Tab
Navigate to: Control Panel > Step 2: Create a Config > Edit.
Click ‘Session’.
Step 5. Enable the 'IsAFK Enabled' Option
If the ‘IsAFK Enabled' option is not selected, the ‘Warn Timeout’ and 'Close Timeout’ settings will NOT be applied later to the user session.
Step 6. Set the ‘AFK warn Timeout (Minutes)’
Refer to this document.
Step 7. Set the ‘AFK Close Timeout (Minutes)’
Navigate to: ‘AFK Close Timeout (Minutes)’.
Enter the Close Timeout duration in the designated text field. (for example, 1 minute in this case).
The Close Timeout duration represents the countdown that starts when the 'Warn Timeout (Minutes)' period expires without clicking 'Continue Streaming'.
Click ‘Save’.
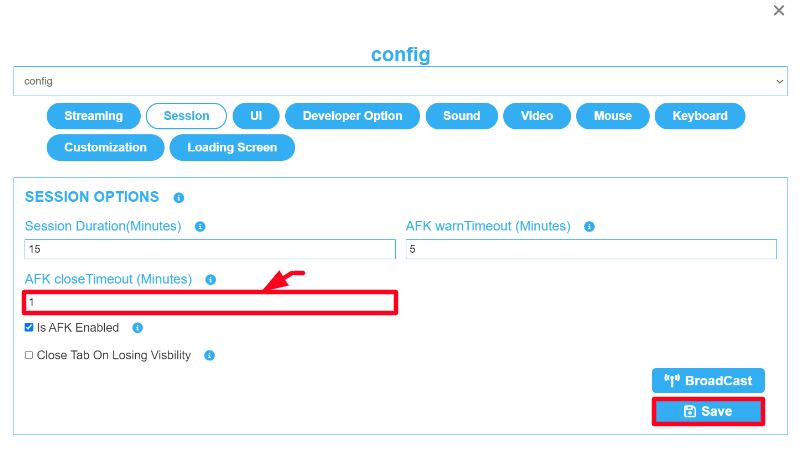
Image 1. Set a time of AFK close Timeout (minutes)
Step 8. Test the Feature’s functionality
Run the game
Navigate to: Control Panel >Step 3: Generate URLs > Play App.
Refrain from using your mouse and keyboard
Avoid any interaction with the app until the ‘AFK Warn Timeout’ warning message gets displayed.
Refrain from clicking on ‘Continue Streaming’
AFK is applicable even when the Tab is minimized.
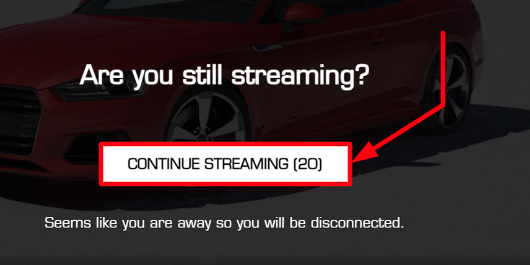
Image 2. Do not Click on Continue Streaming
Wait for the countdown to complete
If you don't interact with your mouse or keyboard after the warning appears and the countdown ends, the session will terminate, and you will be disconnected.
.png?inst-v=c537e3fb-610a-4f13-91f3-b2d790bcf9d8)
Image 3. AFK Close Timeout has reached the end and you got disconnected from the session
Now you are ready to apply the AFK Close Timeout (Minutes) feature!
See all the features in the ‘UI’ Tab. Refer to this document.
Need help? Contact Support
Submit a new request at E3DS support portal.
Requests sent on weekends will not be addressed until the following business day.